You know that feeling when you walk into a kitchen and something just feels… off? Maybe it’s too dark in the corners. Maybe the vibe is sterile. Or maybe, just maybe, there’s a glaring empty space above the island where light should be dancing. That’s usually the moment people start dreaming about pendant lights. They’re the jewelry of the kitchen. They add warmth, character, and that crucial task lighting you need when chopping veggies at midnight. But then the dream hits the reality wall. Wiring? Heights? Drilling into ceilings? Suddenly, the excitement turns into a low-grade panic.
It doesn’t have to be that way. Seriously. I’ve seen folks talk themselves out of beautiful upgrades because they assume it requires a degree in electrical engineering. It doesn’t. With the right prep, a little patience, and respect for the electricity running through your walls, you can do this. Whether you’re renting and looking for a non-permanent hack or you’re ready to hardwire like a pro, this guide is here to walk you through it. No jargon, no judgment, just clear steps to get those lights hanging perfectly. Let’s turn that anxiety into accomplishment.
Getting the Measurements Right Before You Buy Anything
Before you even think about opening a box or buying a single screw, you need to grab a tape measure. This is the step most people skip, and it’s the reason so many pendant lights end up looking awkwardly high or dangerously low. The golden rule for open spaces is simple: the bottom of the pendant should hang at least seven feet from the floor. This ensures nobody bumps their head, especially if you have tall guests or family members. But since we are talking about islands, the counter height is your real anchor point.
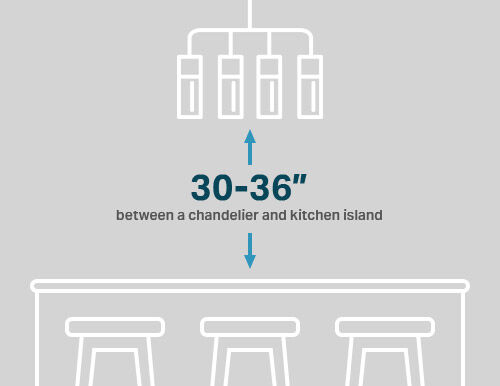
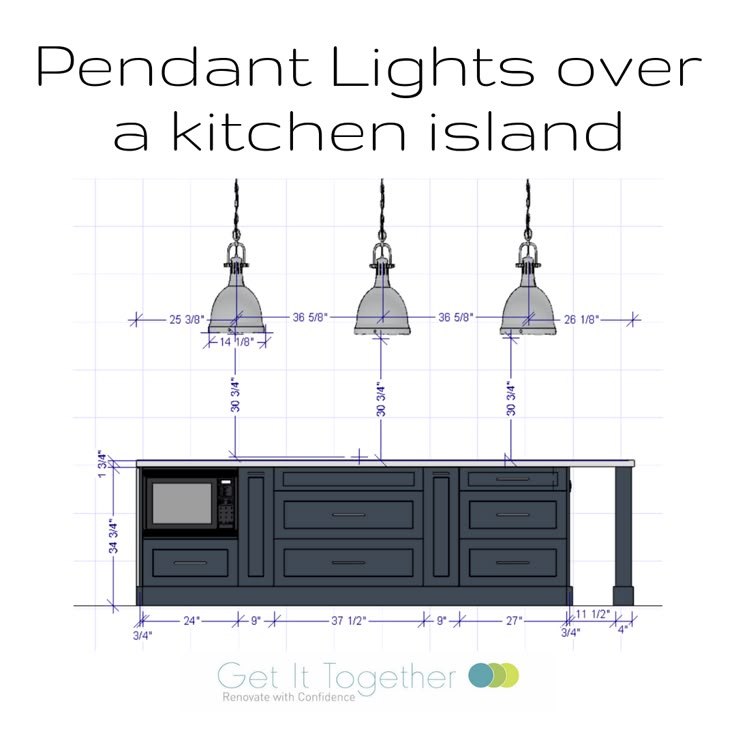
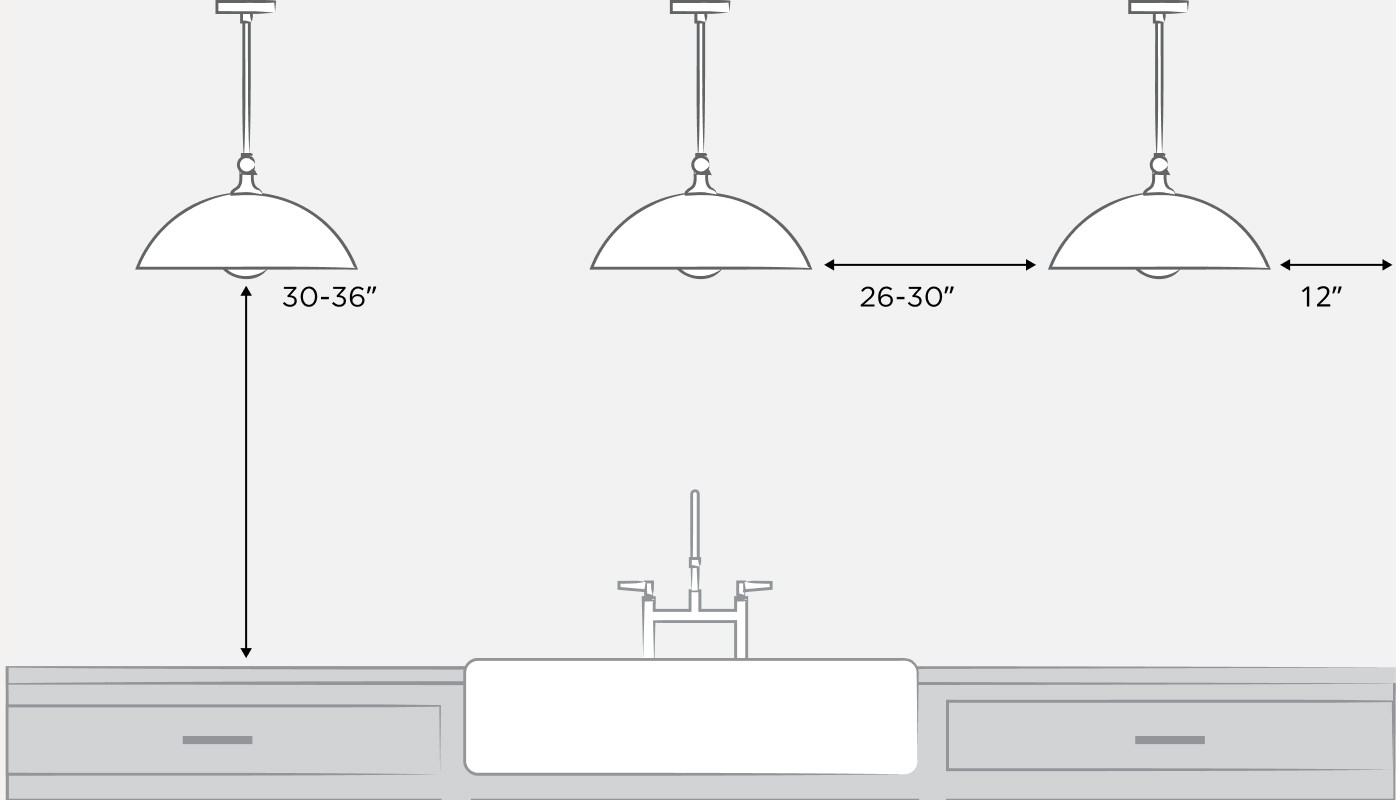
For standard kitchen islands, you want the bottom of the light fixture to sit between 30 and 36 inches above the countertop. Why this range? It’s the sweet spot. If you go higher, the light disperses too much and doesn’t give you that focused glow on your workspace. Go lower, and you block the view across the island, making conversation feel like a game of peek-a-boo. If you have a particularly high ceiling—say, ten feet or more—you can bump that height up slightly to keep the proportions looking balanced. Just remember, you can always adjust a chain or cord down, but you can’t easily make a fixed rod longer without buying new parts.
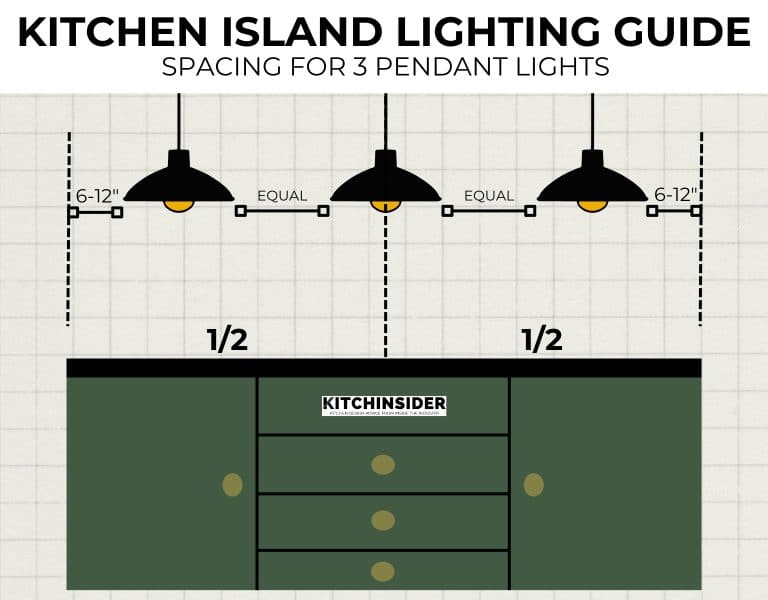
Don’t forget to measure the width of your island, too. This dictates how many pendants you need and how far apart they should sit. A good rule of thumb for spacing is to leave about two feet between each fixture. If your island is six feet long, two pendants centered with equal space on the ends usually look best. If it’s longer, like eight or nine feet, three pendants create a nice rhythm. Write these numbers down. Take a photo of your island with the tape measure in place. It helps visualize the scale when you’re shopping online and staring at tiny product images.
Choosing Between Hardwired and Plug-In Options
Now comes the big decision: do you want to mess with wires inside the ceiling, or do you want a simpler solution? Hardwired lights are the traditional choice. They look clean, professional, and permanent. But they require access to an existing electrical box in the ceiling. If you already have a fixture there, great. You’re halfway home. If you don’t, you’ll need to run new wiring from a nearby power source, which might involve cutting into drywall and fishing cables. For many DIYers, this is where the confidence dips. And rightly so—it’s complex work.
If you’re renting, or if the idea of splicing wires makes your hands shake, consider plug-in pendants. In 2026, these aren’t just afterthoughts; they’re stylish, viable options. You can use a sturdy ceiling hook and anchor to hang the light, then drape the cord neatly along the ceiling and down the wall to an outlet. There are even cord covers that paint over to blend in with your wall color. Another clever trick? Use a recessed light conversion kit. These screw directly into an existing recessed can light socket, turning a boring downlight into a hanging pendant instantly. No wiring needed.
For very lightweight fixtures, some people even use heavy-duty adhesive strips or magnetic mounts, though this is less common for primary lighting. The key here is honesty about your skill level. There is zero shame in choosing a plug-in option. It’s better to have a beautifully lit kitchen with a visible cord than a dark kitchen because you were afraid to start. Plus, plug-ins offer flexibility. You can move them if you rearrange your layout. Hardwired lights are forever. Choose the path that fits your life, not just what looks like the "pro" move on Pinterest.
Safety First: Turning Off Power and Gathering Tools
Let’s talk about safety. This isn’t the place to cut corners. Electricity is invisible, silent, and unforgiving. Before you touch a single wire, you need to kill the power. Go to your breaker panel and flip the switch that controls the circuit you’re working on. Don’t just rely on the wall switch; someone could accidentally flip it back on while you’re up on the ladder. Once you’ve flipped the breaker, test the existing fixture with a non-contact voltage tester. These are cheap, pen-like tools that beep or light up if they detect live current. If it stays quiet, you’re safe to proceed. If it beeps, check your breaker again.
Gather your tools before you climb up. You’ll need a sturdy ladder—none of those wobbly chair stacks. A screwdriver set (both flathead and Phillips) is essential. Wire strippers will make your life infinitely easier than trying to bite insulation off with your teeth (please don’t do that). You’ll also need wire nuts, electrical tape, and possibly a junction box if one isn’t already installed. If you’re drilling into drywall for a new mount, a stud finder is crucial. You want to anchor into wood studs or use proper toggle bolts for drywall. Hanging a heavy glass pendant on a weak plastic anchor is a recipe for disaster.
Wear safety glasses. Dust and debris fall from ceilings, and getting plaster in your eye is a quick way to ruin your day. Also, consider having a helper. Holding a light fixture while trying to connect wires with one hand is frustrating and dangerous. A friend can hold the weight of the fixture while you focus on the connections. It’s faster, safer, and honestly, more fun. Work slowly. Rushing leads to mistakes, and mistakes with electricity lead to trips to the emergency room. Take a breath. You’ve got this.
The Step-by-Step Installation Process
Okay, power is off. Tools are ready. Let’s get to work. Start by removing the old fixture, if there is one. Unscrew the canopy (the part that covers the box) and gently lower the fixture. You’ll see three wires: black (hot), white (neutral), and green or bare copper (ground). Disconnect them by unscrewing the wire nuts. Keep the wires organized. Now, attach the mounting bracket for your new pendant to the electrical box. Make sure it’s secure. This bracket holds the weight, so tighten those screws well.
Next, prepare your new pendant. Thread the wires through the canopy and the mounting hardware. Connect the wires: black to black, white to white, and ground to ground. Twist the exposed copper ends together clockwise, then screw on a wire nut until it’s tight. Give each wire a gentle tug to make sure it’s secure. Wrap electrical tape around the base of the wire nuts for extra peace of mind. Tuck the wires neatly into the electrical box. Be careful not to pinch them. Lift the canopy up against the ceiling and secure it with the provided screws.
If you’re installing multiple pendants, repeat the process for each one. Ensure they are level. You can use a laser level or just a good old-fashioned string line stretched across the ceiling to keep them aligned. Once everything is mounted, double-check all connections. Make sure no bare wire is exposed outside the wire nuts. Replace the light bulbs, but keep the wattage within the fixture’s rating. LED bulbs are best—they run cool and save energy. Finally, restore power at the breaker. Flip the switch. If the lights come on, celebrate. If they don’t, turn the power back off and recheck your connections. It’s usually just a loose wire nut.
Troubleshooting Common Height and Spacing Issues
So, the lights are up. But something feels… off. Maybe they look too small. Maybe they’re casting weird shadows. This is where tweaking comes in. If the lights feel too low, raise them an inch or two. If they’re too high, lower them. Stand back. Look at the island from different angles. Sit on a stool. Does the light glare in your eyes? If so, it’s too low or the bulb is too bright. Consider using dimmable bulbs and installing a dimmer switch. This gives you control over the ambiance. Dinner parties need soft light; chopping carrots needs bright light.
Spacing issues are common too. If the pendants look crowded, you might need to spread them out more. If they look lonely, you might need a third one. Remember, symmetry is pleasing to the eye. If your island is off-center in the room, center the lights over the island, not the room. The island is the focal point. Also, consider the scale of the fixtures. Tiny pendants on a huge island look lost. Massive chandeliers on a small island look overwhelming. If you made a mistake in sizing, don’t panic. You can return them. It’s better to swap than to live with regret.
Another common issue is swaying. If your pendants swing when you walk by, the cords might be too long or the mounting isn’t tight. Check the canopy screws. If the cords are flexible, you can sometimes shorten them or add a weight to the bottom to stabilize them. For rigid rods, ensure the mounting bracket is flush against the ceiling. If you’re still struggling, take a photo and ask for advice online or from a local hardware store expert. Sometimes, a fresh pair of eyes spots the obvious fix you’ve been missing.
The installation is done. The lights work. Now, make them shine. Literally and figuratively. Choose the right color temperature for your bulbs. Warm white (2700K-3000K) creates a cozy, inviting atmosphere, perfect for kitchens where you entertain. Cool white (3500K-4000K) is brighter and more clinical, good for task-heavy zones but less relaxing. Most people prefer warm white for islands. It makes food look better and skin tones look healthier. Avoid daylight bulbs (5000K+) unless you have a specific medical or artistic need; they can feel harsh in a home setting.
Clean your fixtures. Fingerprints and dust dull the glow. Wipe down glass shades with a microfiber cloth. Polish metal finishes with the appropriate cleaner. This small step makes a huge difference in the final look. Also, consider the decor around the island. Do you have barstools? Make sure the lights don’t clash with the style. Industrial pendants go with wood and metal stools. Glass globes pair well with modern, sleek seating. The lights should complement the rest of the room, not fight it.
Finally, enjoy your new space. Invite friends over. Cook a meal. Notice how the light changes the mood. You did this. You measured, you planned, you wired, and you hung. It’s a tangible improvement to your home. And if you made a minor spelling mistak in your notes or scratched the paint a little, who cares? It’s lived-in. It’s yours. The perfection isn’t in the flawless execution; it’s in the courage to try. So sit back, dim the lights, and appreciate the glow. You earned it.