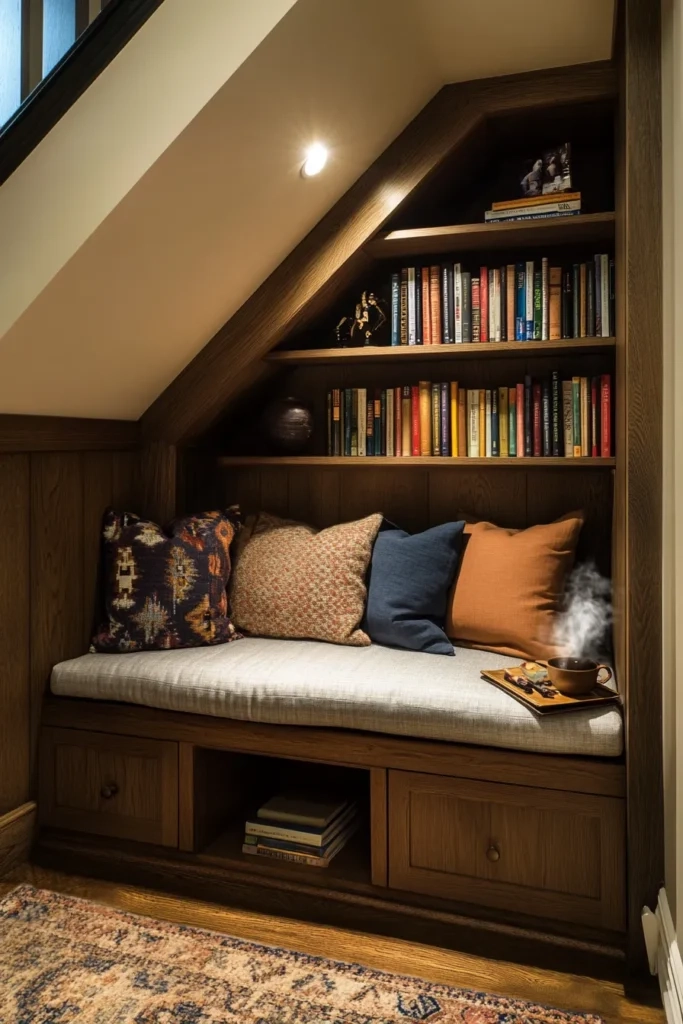
That awkward gap beneath your window is probably the most underused spot in your house. You know the one. It collects dust, maybe a stray sock, and serves as a reminder of wasted potential. But what if it became the corner everyone fights over? With the right built-in bench, a plush cushion, and a bit of carpentry magic, that dead space turns into a sanctuary. It’s not just about aesthetics; it’s about reclaiming square footage in a way that feels intentional and inviting.
We’ve all seen those Pinterest-perfect nooks that look great but feel like sitting on a park bench. Hard, cold, and unforgiving. The secret to a space you’ll actually use isn’t just the woodwork; it’s the soft stuff. The cushions. And let’s be honest, if you can’t store your blankets and books somewhere, the clutter will ruin the vibe faster than you can say "cozy." This guide breaks down exactly how to get it right, from foam density to hidden drawers, so you can create a nook that works as hard as it looks.
Getting the Measurements Right (Because Guessing Doesn’t Work)
Before you even think about fabric swatches, you need to measure. Twice. Actually, measure three times. Window nooks are rarely perfect squares. Older homes, especially those built before 1950, have walls that lean and windows that aren’t quite level. If you order a custom cushion based on a quick guess, you’ll end up with gaps that catch crumbs or a cushion that doesn’t fit at all. Start by measuring the width at the front, middle, and back of the seat. Do the same for the depth. Use the smallest number you find to ensure a snug fit without forcing it.
Don’t forget the height. If you’re building a new bench, standard dining chair height is around 18 inches, but for a relaxed lounge vibe, 16 to 17 inches is often more comfortable. This lower profile makes it easier to curl up with a book. Also, check for obstructions like window cranks, radiators, or baseboards. These little details matter. A cushion that hits a radiator won’t sit flat, and one that covers a crank handle is useless. Take photos of the space from multiple angles. It helps when you’re talking to upholsterers or trying to visualize the final look later on.
Once you have your numbers, decide on the shape. Most nooks are rectangular, but bay windows require segmented cushions. If you have a curved window, you might need a flexible foam option or multiple smaller pillows to fill the space effectively. Remember, the goal is a seamless look. Gaps between cushions can look messy and trap dirt. If you’re going the DIY route, consider making a template out of cardboard first. It’s a cheap way to test the fit before you commit to expensive materials.
Choosing the Right Foam: Comfort vs. Durability
Not all foam is created equal. In fact, using the wrong type is the number one reason window seats become uncomfortable after a few months. You want high-density foam. Look for a density rating of at least 1.8 to 2.5 pounds per cubic foot. Lower density foam might feel soft initially, but it will flatten out quickly, leaving you sitting on a hard wooden box. High-resilience (HR) foam is the gold standard here. It bounces back after you stand up, maintaining its shape and support over years of use.
Thickness matters too. For a standard window seat, a 4-inch cushion is the minimum for comfort. If you plan to use this spot for long reading sessions or napping, go for 6 inches. Anything less than 3 inches will feel like a thin pad, offering little relief from the hard surface below. Some people opt for a layered approach: a firm base layer for support and a softer top layer for that cloud-like feel. This combo gives you the best of both worlds—structure and squish.
Don’t overlook the wrap. Foam alone can feel a bit stiff. Wrapping your foam core in a layer of Dacron (polyester batting) softens the edges and gives the cushion a fuller, more luxurious appearance. It also protects the foam from friction against the fabric, extending its life. If you’re sensitive to heat, remember that dense foam can retain warmth. In sunny spots, this might make the seat uncomfortably hot in the summer. Consider breathable foam options or adding a cooling gel layer if your nook gets direct afternoon sun.
Fabric Selection: Style Meets Real Life
Choosing fabric is where the fun begins, but it’s also where mistakes happen. That beautiful silk velvet might look stunning in the showroom, but will it survive your cat’s claws or a spilled cup of coffee? For window seats, durability is key. You want a fabric with a high double-rub count (at least 15,000 for residential use). Performance fabrics like Sunbrella, Crypton, or microfiber blends are excellent choices because they resist stains, fading, and wear. They’ve come a long way in recent years, offering soft textures that don’t feel plastic-y.
Consider the light exposure. Windows let in UV rays, which can fade fabrics over time. If your nook faces south or west, choose solution-dyed acrylics or fabrics specifically treated for UV resistance. Darker colors hide stains better but show dust and pet hair more easily. Lighter colors feel airy and bright but require more maintenance. A mid-tone pattern or texture is often the smartest compromise. It hides minor spills and wear while keeping the space feeling open.
Texture adds depth to the room. A chunky knit throw pillow against a smooth linen cushion creates visual interest. Don’t be afraid to mix materials. Leather is another durable option that ages beautifully, developing a patina over time. However, it can stick to skin in hot weather and feel cold in winter. If you go with leather, keep some soft textiles nearby to balance the temperature and feel. Always ask for swatches. Seeing the fabric in your actual lighting conditions is crucial. What looks gray in the store might look blue in your home.
Smart Storage Configurations for Small Spaces
A window seat without storage is just a bench. Adding storage transforms it into a functional piece of furniture. The most common configuration is lift-up lids. These are simple to build and provide large, open compartments perfect for storing bulky items like blankets, pillows, or board games. However, they require clearance above the seat to open fully. If there’s a window sill or low-hanging curtain rod, this might not work. In those cases, consider drawers.
Drawers are more complex to install but offer easier access. You don’t need to remove pillows to get to your stuff. They’re ideal for smaller items like books, remotes, or knitting supplies. For a sleek look, go with handle-less push-to-open drawers. If you’re working with a tight budget, open cubbies are a great alternative. You can slide in baskets or bins to keep things organized. This option is also easier to DIY since you don’t need hardware or sliding mechanisms.
Think about what you’ll actually store. If it’s seasonal decor, deep lift-up compartments are fine. If it’s daily essentials like chargers and magazines, shallow drawers near the front are more practical. Some modern designs incorporate charging stations directly into the side panels or under the lip of the seat. This keeps cords hidden and devices powered up. Just make sure to leave enough room for ventilation if you’re enclosing electronics. Safety first.
DIY vs. Custom: What’s Right for You?
Making your own cushions can save money, but it’s not always the best route. Ready-made cushions are rarely the right size for unique nooks. You’ll likely end up with gaps or overhangs. Custom cushions, while pricier, ensure a perfect fit and allow you to choose every detail, from foam density to piping color. In 2026, many online retailers offer easy-to-use measuring tools and virtual previews, making the custom process less intimidating. If your nook is a standard size, you might find a good match off-the-shelf, but it’s rare.
DIY upholstery is a rewarding project if you have sewing skills. You’ll need a heavy-duty sewing machine, as regular ones struggle with thick fabrics and multiple layers. The learning curve is steep, especially when it comes to zippers and corners. If you mess up, you waste expensive fabric. For beginners, consider a slipcover approach. Make a simple envelope-style cover that fits over a basic foam pad. It’s easier to sew and allows you to change the look seasonally without replacing the entire cushion.
Hiring a professional upholsterer is the safest bet for a polished result. They can advise on structural issues, like whether your bench frame needs reinforcement to support the weight of stored items. They also have access to trade-only fabrics and foams that aren’t available to consumers. Get quotes from at least three providers. Ask to see examples of their previous window seat projects. Check the stitching quality and how well the patterns align. A good job should last ten years or more, so it’s worth investing in quality upfront.
Once the hardware is in place, it’s time to make it feel like home. Layering is key. Start with your base cushion, then add a few throw pillows in varying sizes and shapes. Mix firm square pillows with softer lumbar supports. This creates a backdrop that makes leaning back comfortable. Add a textured throw blanket draped over one corner. It invites you to snuggle up and adds a pop of color or pattern.
Lighting makes a huge difference. A window nook can feel dark in the evening if it relies solely on overhead lights. Add a small plug-in wall sconce or a floor lamp nearby. Warm light (2700K-3000K) creates a cozy atmosphere, while cool light feels clinical. If you have outlets nearby, consider a small table lamp on a side stool. Reading lights with adjustable arms are perfect for directing light exactly where you need it without glare.
Personal touches bring the space to life. A small tray for your coffee cup, a stack of favorite books, or a plant that thrives in indirect light. Keep clutter minimal. The beauty of a nook is its simplicity. If you’ve added storage, use it to keep the surface clear. Rotate your decor seasonally. Swap heavy wool throws for lightweight cotton in summer. Change pillow covers to reflect the mood of the season. This keeps the space feeling fresh and engaging without requiring a major overhaul.
Creating the perfect window nook is about balancing form and function. It’s not just a pretty picture; it’s a place to rest, read, and recharge. By choosing the right foam, durable fabric, and smart storage, you build a foundation that lasts. Add your personal style on top, and you’ve got a spot that’s truly yours. So, measure that space, pick your fabric, and start building. Your future self, curled up with a good book, will thank you.