
There’s something almost magical about watching a clear, cold pane of glass suddenly come alive with texture. One minute it’s just a window or a bottle, invisible and utilitarian. The next, it’s got soul. It catches the light differently. It tells a story. That’s the power of sandblasting. It’s not just about making things look frosted or pretty; it’s about sculpting light itself.
You might think you need a massive industrial workshop to pull this off. Or maybe you assume it’s some ancient secret kept by master craftsmen in dusty studios. But here’s the thing: the barrier to entry has never been lower. In 2026, whether you’re a professional artist looking to add depth to your portfolio or a hobbyist wanting to upcycle that old jar sitting in your recycling bin, the tools are right there. And the results? They can be breathtaking.
Let’s talk about why this matters. We live in a world of mass-produced perfection. Everything is smooth, shiny, and identical. Sandblasting breaks that monotony. It introduces imperfection, sure, but the good kind. The kind that makes you want to reach out and touch it. It turns the ordinary into something you’d actually want to keep on your shelf. So, how does it work? And more importantly, how can you start doing it yourself?
The Science Behind the Spray
At its core, sandblasting—often called abrasive blasting or etching in the art world—is pretty straightforward physics. You’re taking tiny particles of abrasive material and shooting them at the glass surface at high speed. Think of it like a million tiny chisels hitting the glass all at once. Each particle chips away a microscopic piece of the surface. When you do this thousands of times per second, you change the way light interacts with the glass.
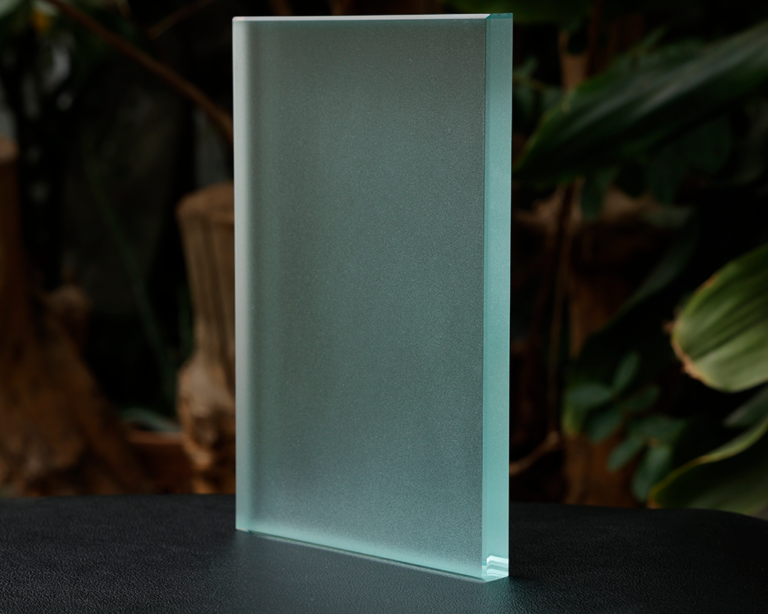
Instead of passing straight through, the light hits those tiny pits and scratches and scatters. That’s what creates that classic frosted, matte look. But it’s not just about frosting. By controlling the pressure, the type of abrasive, and the duration of the blast, you can create varying levels of opacity. You can go from a soft, satin finish that barely obscures what’s behind it, to a deep, carved relief that you can feel with your fingertips. This versatility is what sets it apart from other methods like laser engraving, which tends to just mark the surface rather than truly sculpting it.
The term "sand" blasting is actually a bit of a misnomer these days. Real sand (silica) isn’t used much anymore because breathing in silica dust is dangerous—it can cause serious lung issues like silicosis. Modern artists and professionals use safer alternatives like aluminum oxide, silicon carbide, or even crushed walnut shells for softer effects. Silicon carbide, for instance, is a favorite for glass because it’s sharp and cuts cleanly, giving you precise control over the design. It’s all about finding the right grit for the job. Coarser grits remove material faster and create a rougher texture, while finer grits give you that smooth, elegant satin finish.
Tools of the Trade: What You Actually Need
So, you’re ready to try it. What do you need? If you’re just dipping your toes in, you don’t need to break the bank. A basic setup can be surprisingly affordable. At the heart of it all is the blaster itself. For beginners, a siphon-feed gun connected to an air compressor is usually the way to go. These are widely available from brands like LEMATEC, which have become popular in the DIY community for their reliability and ease of use. You’ll also need a hose, a nozzle, and obviously, an air compressor that can deliver consistent pressure.
But the tool is only half the battle. The other half is containment. Sandblasting is messy. Like, really messy. The abrasive bounces off the glass and goes everywhere. If you try to do this in your living room, you will regret it. You need a cabinet or a well-ventilated booth. Some people build their own using old storage bins and heavy-duty gloves built into the sides. Others buy pre-made cabinets. The key is to keep the dust contained so you aren’t breathing it in and so you can reclaim some of the abrasive media for reuse. Speaking of which, always wear a proper respirator mask, safety goggles, and protective clothing. Safety first, art second. Always.
Don’t forget the stencils. This is where your design comes to life. You can’t just spray freely if you want a specific pattern. You need to mask off the areas you want to keep clear. Vinyl stencils are the gold standard here. They stick well to glass and peel off cleanly without leaving residue. You can buy pre-cut designs or use a cutting machine to create your own custom shapes. The quality of your stencil matters—a poor seal means the abrasive will sneak underneath, ruining your crisp lines. Take your time with this part. It’s the difference between a amateurish blob and a professional-looking piece.
From Waste to Wonder: The Creative Process
One of the most rewarding aspects of sandblasting is the potential for upcycling. In 2026, sustainability isn’t just a buzzword; it’s a mindset. Why buy new glass when you can transform what’s already out there? Old windows, discarded bottles, thrift store finds—they’re all canvases waiting for a second life. There’s a certain poetry to taking something broken or discarded and turning it into a heirloom. It’s mindful crafting in motion.
Let’s walk through a simple project. Say you have an old wine bottle. First, you clean it thoroughly. Any grease or label glue will prevent your stencil from sticking. Next, you apply your stencil. Maybe you want a simple geometric pattern or a name. Press it down firmly, ensuring there are no air bubbles. Then, you load your blaster with your chosen abrasive—say, 100-grit silicon carbide for a nice medium frost. You step into your cabinet, put on your gear, and start blasting. Keep the nozzle moving in steady, overlapping passes. Don’t linger in one spot too long, or you’ll dig too deep.
As you work, you’ll see the clear glass turn cloudy. It’s satisfying to watch the design emerge. Once you’re happy with the depth, you stop, let the dust settle, and carefully peel off the stencil. The reveal is always the best part. Suddenly, that plain brown bottle has a sophisticated, frosted label. It looks expensive. It looks intentional. You can take it further, too. By using multiple stencils and varying the blast time, you can create layers of depth. Lighter areas where you blasted briefly, darker frosted areas where you blasted longer. It’s like painting, but with air and stone.
Techniques for Depth and Texture
While basic frosting is great, the real magic happens when you start playing with depth. This is often referred to as "sandcarving." It’s a step up from simple etching. Instead of just changing the surface texture, you’re actually removing significant amounts of glass to create a 3D effect. This requires more skill and often different equipment, like a pressure pot blaster which delivers a more consistent and powerful stream of abrasive.
To achieve this, you typically use a resist material instead of a thin vinyl stencil. Rubber masks or thick tape are common. You cut your design into the resist, then blast away the exposed glass. By controlling the angle of the nozzle and the duration, you can create beveled edges and shadows within the design. For example, if you’re carving a leaf, you might blast the veins deeper than the outline to give it a realistic, organic look. It takes practice to get a feel for how long to blast to achieve a certain depth, but the results are stunning.
Another technique is shading. This involves using a shield or your hand (gloved, obviously) to block part of the nozzle’s spray, creating a gradient effect. It’s subtle, but it adds a level of sophistication that flat etching can’t match. Imagine a sunset scene on a window pane, where the sky fades from clear to deeply frosted. That’s shading. It requires a steady hand and a good eye for detail, but it’s worth learning. These advanced techniques transform glass from a decorative object into a true piece of art.
Safety and Best Practices for 2026
Let’s circle back to safety, because it’s that important. The technology has improved, but the risks haven’t gone away. Inhaling abrasive dust is bad for your lungs, regardless of the material. Silica is the worst offender, but even aluminum oxide can cause irritation. Always use a NIOSH-approved respirator. Not a dust mask, a real respirator. And ensure your workspace is well-ventilated. If you’re using a cabinet, check the filters regularly. A clogged filter reduces suction and lets dust escape.
Eye protection is non-negotiable. Abrasive particles can bounce back with surprising force. Wear sealed goggles, not just glasses. And protect your skin. Long sleeves and gloves are a must. The abrasive can sting if it hits bare skin, and prolonged exposure can cause irritation. Also, inspect your equipment before every use. Check hoses for cracks, nozzles for wear, and connections for leaks. A burst hose under pressure is no joke.
In terms of best practices, patience is your best friend. Rushing leads to mistakes. Take your time applying stencils. Test your blast settings on a scrap piece of glass before committing to your final piece. Keep your workspace organized. A cluttered bench is a dangerous bench. And finally, respect the material. Glass is fragile. Handle it with care, especially after blasting, as the etched areas can be slightly more susceptible to stress. Treat your tools well, and they’ll treat you well.
It might seem counterintuitive, but in an age dominated by digital screens and virtual reality, tactile arts like sandblasting are having a renaissance. People crave physical connection. They want objects they can hold, textures they can feel. Sandblasted glass offers that. It’s permanent. It doesn’t glitch. It doesn’t need a battery. It’s just there, beautiful and solid. This demand has led to a surge in personalized gifts and custom home decor. Think monogrammed mirrors, etched family trees on window panes, or custom signage for small businesses.
Finding your style means experimenting. Don’t be afraid to make mistakes. Some of the best designs come from happy accidents. Maybe you slipped and created a unique streak that looks like lightning. Keep it. Embrace it. Look for inspiration in nature, architecture, or even typography. The versatility of sandblasting allows you to mimic almost any aesthetic, from rustic and rough to sleek and modern. Join online communities or local maker spaces. Sharing tips and seeing what others are doing can spark new ideas.
As we move further into 2026, the line between traditional craft and modern technology continues to blur. You might use a digital cutter to make your stencils, but the act of blasting remains hands-on and visceral. It’s a blend of old and new. And that’s what makes it so appealing. It’s accessible yet deep. Simple yet complex. Whether you’re doing it for fun, for profit, or just for the joy of creation, sandblasting offers a unique way to express yourself. So grab a piece of glass, suit up, and start blasting. You might just surprise yourself with what you create.
There’s a quiet satisfaction in finishing a piece. You step back, wipe the dust off the surface, and hold it up to the light. The way it glows, diffused and soft, is unlike anything else. It’s proof that with a little pressure, some grit, and a lot of patience, you can transform the mundane into the magnificent. It’s not just about the glass. It’s about the process. The focus. The flow. And in the end, that’s what art is really about.
![Etching And Sandblasting Glass [Step-By-Step Guide] in Sandblasted Glass Finish](https://cdn.royslade.com/2026/05/etching-and-sandblasting-glass-step-by-step-guide-in-sandblasted-glass-finish.jpg)


![Etching And Sandblasting Glass [Step-By-Step Guide] in Sandblasted Glass Finish](https://cdn.royslade.com/2026/05/etching-and-sandblasting-glass-step-by-step-guide-in-sandblasted-glass-finish.jpg?width=992&f=jpg)


