You know that feeling. You spend three hours sanding a piece of walnut, applying what you think is a perfect coat of stain. It looks rich and deep under the single bulb hanging from your ceiling. You step back, proud. Then, you drag it out into the driveway sunlight. And your heart sinks. The wood looks muddy. Orange. Nothing like the sample card promised.
It’s not your fault. Well, mostly. It’s the light.
We often treat garage lighting as an afterthought. We buy the cheapest bulbs, screw them in, and call it a day. But if you are doing anything more than parking a car—detailing, woodworking, engine repair, or even just organizing—the quality of that light changes everything. It’s not just about brightness. It’s about color. Specifically, color temperature. Getting this wrong means working harder, seeing less, and making mistakes that cost time and money. Let’s fix that.
The Kelvin Scale Isn’t Just Science Jargon
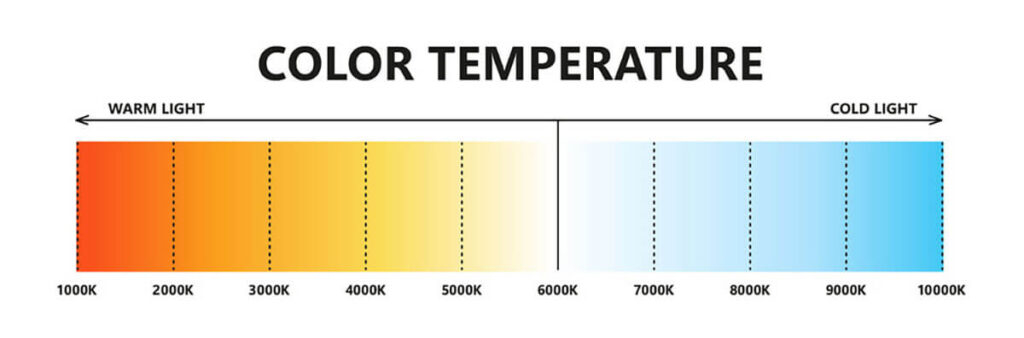
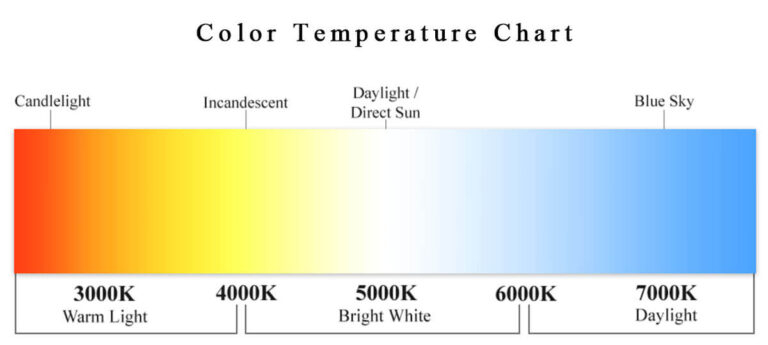
First, let’s clear up the confusion. When you walk into a hardware store (or scroll through endless online listings), you see numbers like 2700K, 4000K, or 6500K. What do they mean? They refer to the Kelvin scale, which measures the color appearance of the light source. Lower numbers are warm, yellowish, and cozy—like a sunset or an old incandescent bulb. Higher numbers are cool, bluish, and crisp—like midday sun on a clear day.
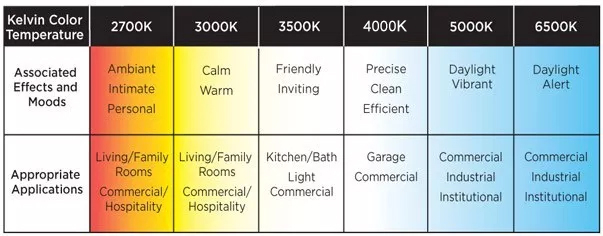
For a living room, you want warmth. You want 2700K or 3000K. It relaxes you. But a garage isn’t a lounge. It’s a workspace. If you use warm light here, everything looks yellowed. Shadows get soft and undefined. You lose contrast. That’s dangerous when you’re holding a chisel or trying to spot a hairline crack in a brake line. You need light that mimics daylight because our eyes evolved to work best in it.
Think of it like this: would a surgeon operate under a dim, yellow lamp? No way. They need bright, white, neutral light to see tissue differences clearly. Your garage projects might not be life-or-death, but the principle is the same. Precision requires clarity. And clarity comes from choosing the right point on that Kelvin scale.
Why 4000K to 5000K Is the Sweet Spot
So, what’s the magic number? After talking to countless woodworkers, mechanics, and lighting experts, the consensus for 2026 is clear: aim for the 4000K to 5000K range. This is often called "neutral white" or "cool white." It’s the Goldilocks zone. Not too yellow, not too blue. Just right.
At 4000K, the light is balanced. It provides excellent visibility without being harsh on the eyes during long sessions. It’s great for general tasks, storage organization, and moderate DIY work. If you spend hours in there, 4000K feels natural and reduces eye strain. It’s forgiving but still sharp enough to see details.
Push it up to 5000K, and you enter "daylight" territory. This is where precision shines. Colors appear truer. Contrasts pop. If you are matching paint colors, inspecting engine components, or checking the grain direction on wood, 5000K is superior. It reveals flaws that 4000K might hide. Many pros prefer 5000K for detailed work because it minimizes the chance of error. However, some find it slightly stark if the garage lacks other ambient light sources.
The Hidden Hero: CRI Matters More Than You Think
Here is the trap most people fall into. They buy a 5000K LED bulb because the box says "Daylight," but they ignore one critical spec: CRI, or Color Rendering Index. This is a measure of how accurately a light source reveals the true colors of objects compared to natural sunlight. Sunlight has a CRI of 100. Most cheap LEDs hover around 80.
Why does this matter? Imagine you are detailing a car. Under an 80 CRI light, a swirl mark in the clear coat might be invisible. Under a 90+ CRI light, it jumps out at you. Or consider woodworking. Stains look different under low CRI lights. You might think two boards match, but under high CRI lighting, you see one is redder and the other is browner. That mismatch won’t show up until you’re outside in real sunlight.
In 2026, there is no excuse for low CRI in a workshop. Look for bulbs labeled with a CRI of 90 or higher. Some premium options even hit 95+. Yes, they cost a few dollars more. But think about the cost of ruining a $200 bottle of finish or having to repaint a panel because the color looked wrong under bad light. It’s a small investment for huge peace of mind. Always check the fine print. Don’t just trust the "Kelvin" number.
Task-Specific Lighting: One Size Doesn’t Fit All
While 4000K-5000K is the general rule, your specific hobby might nudge you one way or the other. Let’s break it down by activity. If you are primarily using your garage as a gym or for general storage, 4000K is plenty. It’s energizing enough to keep you awake during a workout but not so clinical that it feels like a hospital. It’s comfortable for moving boxes and finding tools.
But if you are into automotive detailing or painting, lean toward 5000K or even 6000K. These higher temperatures provide the crispness needed to see imperfections in paint, glass, and chrome. The blue-ish tint helps highlight dust particles and scratches. Just be careful going above 6000K. It can start to look unnatural and cause glare, which actually reduces visibility over time.
For woodworkers and artists, stick to 4000K-5000K with high CRI. You need to see the true tone of the wood and the accuracy of your finishes. A 5000K light with a 95 CRI is arguably the best tool in your shop, second only to your table saw. It ensures that what you see in the shop is what you get in the living room. Avoid the extreme blues of 6500K unless you are doing very specific electronic work where high contrast is key, as it can distort warm wood tones.
Layering Light to Kill Shadows
Even the perfect color temperature fails if your lighting layout is poor. A single row of overhead lights creates deep shadows under your car, behind your workbench, and inside cabinets. Shadows are the enemy of precision. They hide details and force your eyes to constantly adjust, leading to fatigue and headaches.
The solution is layering. Start with ambient lighting—your main overhead fixtures. Use 4000K or 5000K LEDs here to flood the space with even, neutral light. Then, add task lighting. Under-cabinet strips for your workbench. A portable drop light for engine bays. A focused desk lamp for intricate model building. These task lights should match your ambient color temperature to avoid weird color clashes.
Don’t forget vertical illumination. Walls often stay dark, making the space feel smaller and reducing overall brightness perception. Adding wall-wash lights or mounting fixtures higher on the walls bounces light around, filling in those tricky corners. In 2026, smart lighting systems make this easier. You can zone your lights, turning on only what you need for a specific task, saving energy and reducing clutter. But always ensure the core work zones are shadow-free.
Let’s talk about the pitfalls. The biggest mistake? Mixing color temperatures. Having a 3000K bulb in one fixture and a 5000K in another creates a disjointed, messy visual environment. Your brain struggles to process the conflicting cues, leading to faster eye strain. Pick one primary temperature for the whole space and stick to it. Consistency is key.
Another error is ignoring glare. Bright, uncovered LEDs pointed directly at your eyes are worse than dim light. They cause squinting and blind spots. Use fixtures with diffusers or lenses that spread the light evenly. Position overhead lights so they aren’t directly in your line of sight when you’re looking up or working on a raised surface. Angle task lights away from reflective surfaces like car hoods or glossy countertops.
Finally, don’t skimp on lumens. Color temperature is about hue, but lumens are about brightness. A 5000K bulb that’s too dim is useless. For a standard two-car garage, you generally want between 4000 to 6000 lumens total for ambient light, plus extra for task areas. Check the lumen output, not just the wattage. LED technology has changed the game, so old rules about watts don’t apply. Focus on lumens for brightness and Kelvin for color. Get both right, and your garage transforms.
Getting your garage lighting right isn’t just about buying expensive bulbs. It’s about understanding how light interacts with your work. By choosing a neutral temperature between 4000K and 5000K, prioritizing a high CRI, and layering your light sources, you create a space that supports precision rather than hindering it. You’ll work faster, make fewer mistakes, and actually enjoy the time you spend there.
It’s a small change with a massive impact. Next time you’re in the hardware aisle, pause before grabbing the cheapest pack. Look at the Kelvin number. Check the CRI. Think about what you’re building or fixing. Your eyes—and your next project—will thank you. After all, a well-lit shop is a happy shop. And isn’t that what we’re all aiming for?