Ever stood in the middle of a room, tape measure in one hand, phone in the other, feeling like you’re trying to solve a geometry problem you didn’t sign up for? You’re not alone. It’s 2026, and while we have apps that can map our entire house in 3D with a simple scan, there’s still something deeply human—and slightly terrifying—about committing to a purchase based on numbers you scribbled down on a scrap of paper. Whether you’re eyeing a vintage Persian rug that costs more than your first car or planning a full wall-to-wall carpet refresh, the margin for error is slim. Get it wrong, and you’re stuck with a rug that looks like it’s floating in a sea of bare floor, or worse, carpet rolls that don’t quite meet at the seams.
The stakes feel high because they are. A bad measurement isn’t just an inconvenience; it’s wasted money and time. But here’s the good news: measuring isn’t rocket science. It’s just about paying attention to the details that most of us overlook in our rush to see the finished product. We’ve all been there. You measure the widest part of the room, assume it’s a perfect square, and order accordingly. Then the delivery truck arrives, and reality hits. The walls aren’t straight. The alcove is deeper than it looked. Suddenly, your dream renovation feels like a nightmare. Let’s change that narrative. By slowing down and approaching your space with a bit of methodical care, you can transform anxiety into confidence.
This guide isn’t just about numbers. It’s about understanding the soul of your space. Every nook, every cranny, and every weird angle tells a story about how you live. When you measure correctly, you’re not just buying material; you’re curating an environment that fits your life perfectly. So, put down the phone for a second. Grab a real tape measure—the metal kind that snaps back if you’re not careful. Let’s walk through this together, step by step, so you can buy with certainty and install with pride.
The Toolkit: More Than Just a Tape Measure
Before you even think about stepping foot into the room, you need to gather your tools. Sure, a tape measure is the star of the show, but it’s got some supporting actors that are just as critical. First, grab a notepad and a pencil. Not your phone. Why? Because phones get locked, screens go dark, and batteries die. A pencil on paper is reliable. It’s tactile. You can sketch the room as you go, which helps visualize the space in a way a spreadsheet never could. Plus, there’s something satisfying about crossing out a wrong number and writing the right one next to it. It feels honest.
You’ll also want a laser measure if you have one. In 2026, these devices are cheap, accurate, and incredibly handy for long distances or high ceilings where a metal tape might sag or bend. If you don’t have one, don’t sweat it. A standard 25-foot tape measure works fine for most residential rooms. Just make sure the hook at the end isn’t bent or loose. That little metal tab moves slightly on purpose—it accounts for whether you’re measuring from the inside or outside of an edge—but if it’s wobbly, your measurements will be off. Check it against a known distance, like a standard door frame (usually 30 or 32 inches wide), to calibrate your eye.
Don’t forget a helper. Measuring alone is possible, but it’s prone to error. Having a second person to hold the end of the tape while you read the number eliminates the "did I say 12 feet or 13?" debate. If you’re solo, use painter’s tape to mark your starting point on the floor or wall. This keeps the tape from slipping and gives you a clear visual reference. And bring a calculator. Or use the one on your phone, since you’re already holding it for photos. Taking pictures of each wall and corner is a pro move. Snap a photo of the empty room, then snap close-ups of any tricky spots like built-in shelves or radiators. These photos become your backup plan when you’re staring at your notes later, trying to remember if that bump was six inches or eight.
Mapping the Territory: Sketching Before Measuring
Here’s where most people skip a step, and it’s the step that saves them from disaster. Don’t just start measuring random walls. Draw the room first. It doesn’t have to be pretty. In fact, ugly sketches are often better because you’re focused on accuracy, not artistry. Start with a rough outline of the room’s shape. Is it a rectangle? An L-shape? Does it have a bay window that juts out? Draw it all down. Label the walls North, South, East, West, or just Wall A, B, C, D. This creates a mental map that prevents you from mixing up which measurement belongs to which side.
As you sketch, note down any permanent fixtures. Fireplaces, columns, closet doors, and HVAC vents all impact how much carpet or rug space you actually have. For carpet installation, you need to know if you’re going under door jambs or stopping at the threshold. For rugs, you need to know if a sofa leg will hang off the edge. Mark these obstacles on your sketch with approximate locations. You don’t need precise dimensions for them yet, just their presence. This holistic view helps you spot potential issues early. For example, if you see a large column in the middle of your sketch, you’ll realize you can’t just buy one giant piece of carpet without a seam. You’ll need to plan for cuts and joins.
Once your sketch is done, double-check it against the actual room. Walk around the perimeter. Does your drawing match the reality? Did you forget that little alcove behind the door? Add it in. This process forces you to look at your space critically, rather than just glancing at it. It shifts your perspective from "this is my living room" to "this is a geometric puzzle I need to solve." That shift in mindset is crucial. It turns a vague idea into a concrete plan. And when you’re standing in the store or talking to a contractor, having that sketch in hand makes you look like you know what you’re doing. Because you do.
The Nitty-Gritty: Measuring for Wall-to-Wall Carpet
Now, let’s get into the weeds. Measuring for wall-to-wall carpet is different from buying a rug because you’re covering every inch of the floor, including the weird bits. Start by measuring the length and width of the main rectangular area of the room. Measure from wall to wall, not baseboard to baseboard. Wait, actually, measure from baseboard to baseboard if you’re installing over existing padding, but usually, professionals measure to the wall studs or tack strips. To be safe, measure the visible floor space from edge to edge. Take three measurements for each dimension: one at the top of the room, one in the middle, and one at the bottom. Walls are rarely perfectly parallel. Use the largest number you find. Always round up to the nearest inch. Better to have a little extra than to come up short.
Next, tackle the irregularities. If your room has an L-shape, break it down into two rectangles. Measure each rectangle separately. Don’t try to do complex geometry in your head. Calculate the square footage of each section (Length x Width) and add them together. For closets, measure inside the door frame. Will you carpet inside the closet? Most people do, but some don’t. Decide now. If yes, include those dimensions. If no, stop your measurement at the threshold. Hallways are tricky because they’re long and narrow. Measure the full length and width. Remember, carpet comes in rolls, usually 12 or 15 feet wide. If your hallway is 4 feet wide, you’ll still pay for a 12-foot wide strip unless the installer can splice it efficiently. Ask about "waste factor."
Speaking of waste, you need to add a buffer. Standard practice is to add 10% to your total square footage for cuts, seams, and mistakes. If your room has lots of corners or angles, bump that up to 15%. This isn’t a scam; it’s reality. Installers need room to trim edges and match patterns. If you’re buying patterned carpet, you might need even more to align the design across seams. Write down your final square footage clearly. Total Sq Ft = (Area of Main Room + Area of Closets + Area of Hallways) x 1.10. Keep this number handy. It’s your golden ticket when getting quotes.
Rug Rules: Proportion and Placement
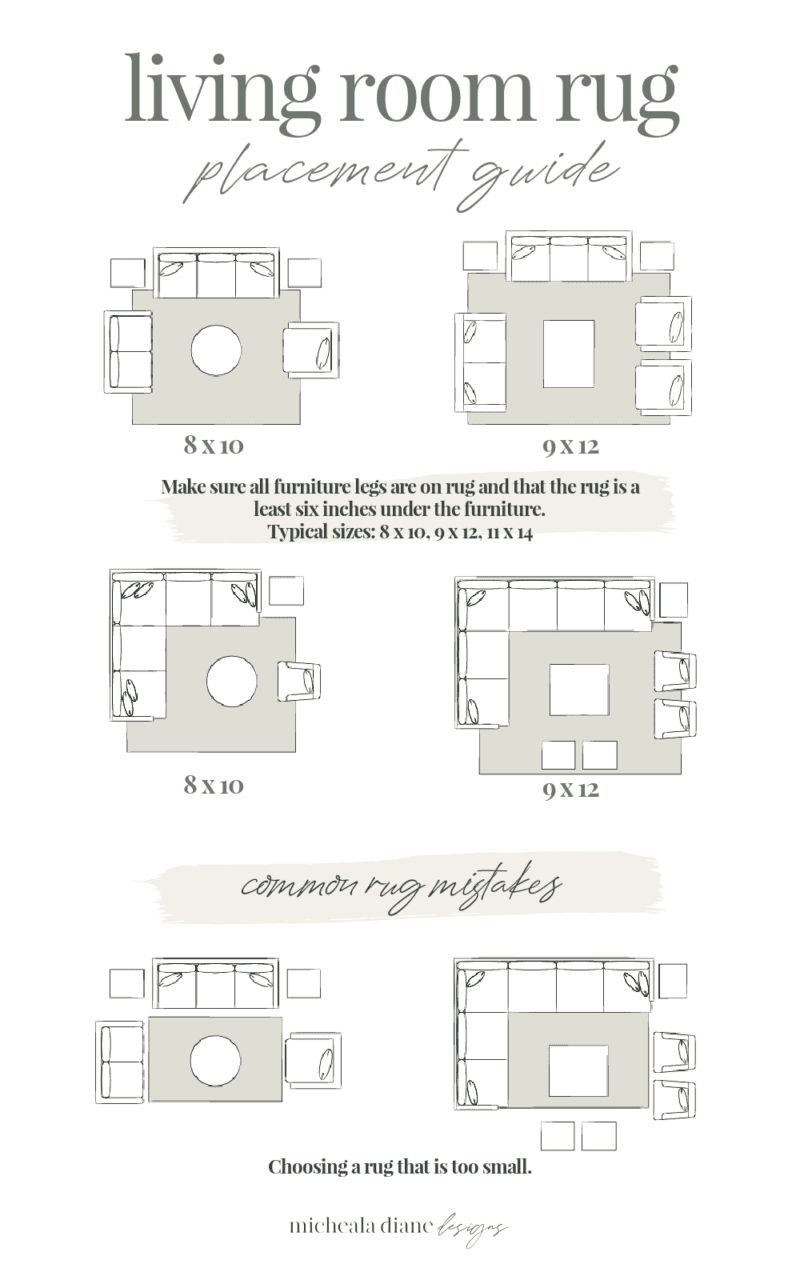
Rugs are a different beast. You’re not covering the floor; you’re framing it. The biggest mistake people make here is buying a rug that’s too small. It’s a classic blunder. A tiny rug in a large room looks like an afterthought, like you ran out of budget. To avoid this, you need to think about furniture placement. In a living room, you generally want all the front legs of your furniture sitting on the rug. This anchors the seating area and makes the space feel cohesive. So, measure the distance from the front of your sofa to the front of your chairs. Add a few inches on each side for breathing room. That’s your minimum rug size.
For dining rooms, the rule is simpler but stricter. The rug needs to be large enough that when you pull a chair out to sit down, the back legs of the chair stay on the rug. If they slide off onto the bare floor, it’s annoying and can damage the rug edges. Measure your table’s dimensions, then add at least 24 to 30 inches to each side. For a standard 6-person table, that usually means an 8×10 or 9×12 rug. Don’t skimp here. A cramped dining rug feels chaotic. Take your tape measure and simulate the chair pull-out. Stand where the chair would be. Pull it back. Did your heels hit the edge? If so, go bigger.
Bedrooms offer more flexibility, but consistency is key. You can go with a large rug that sits under the bed and extends out on three sides, creating a soft landing for your feet in the morning. Or, you can use two smaller runners on either side of the bed. If you choose the full-under-bed option, measure the bed’s width and length, then add 2 to 3 feet on the sides and foot of the bed. This ensures the rug is visible and functional. Avoid placing a rug only at the foot of the bed unless the room is very small; it tends to look disconnected. Always sketch your furniture layout on your room diagram before finalizing the rug size. Visualizing it helps prevent buyer’s remorse.
Navigating the Tricky Bits: Stairs, Corners, and Odd Angles
Let’s talk about the stuff that makes installers groan and DIYers cry: stairs. Measuring for stair carpet is precise work. Each step has a tread (the part you step on) and a riser (the vertical part). You need to measure the width of the tread, the depth of the tread, and the height of the riser. Multiply the sum of these three numbers by the number of steps. Then, add extra for the nose (the rounded edge) and for wrapping around the sides if you’re doing a full wrap. Stair carpet often requires a specific type of padding and installation technique, so don’t just guess the yardage. Count the steps twice. It’s easy to lose track.
Corners and bay windows require a similar level of detail. For a bay window, measure the width of each window pane and the depth of the protrusion. Treat it as a separate geometric shape attached to the main room. If you’re carpeting, you’ll likely need a seam here. Note the angle of the bay. Is it 30 degrees? 45 degrees? This affects how the carpet is cut. For rugs, a bay window might be a great spot for a custom-shaped rug or a smaller accent piece. Measure the floor space available, keeping in mind that curtains or blinds might hang down into the space. You don’t want a rug bunching up under heavy drapes.
Odd angles and non-90-degree corners are common in older homes. Don’t assume your walls are square. Use a carpenter’s square or even a piece of paper to check the corners. If a corner is significantly off-square, it will affect how a rectangular rug sits. It might look crooked even if it’s measured correctly. In these cases, consider a round or oval rug, which forgives asymmetrical spaces. Or, embrace the quirk and use a custom-bound carpet remnant. Measure the longest and shortest points of the irregular area. Provide these details to your retailer. They can help you determine if a standard size will work or if you need a custom solution. Honesty about the weirdness of your space saves everyone time.
You’ve measured. You’ve sketched. You’ve calculated. Are you done? Not quite. Now comes the most important part: the sanity check. Go back and measure everything one more time. It sounds tedious, but it’s cheaper than returning a $2,000 rug. Compare your new measurements with your old ones. Do they match? If not, measure a third time. Look for outliers. Did you measure one wall in feet and inches and another in just inches? Consistency is key. Convert everything to inches for calculation, then convert back to feet if needed. This reduces math errors.
Watch out for common pitfalls. One big one is ignoring the door swing. Will a door hit the rug or carpet edge? If so, you might need a transition strip or a lower-pile carpet in that spot. Another pitfall is forgetting about heating vents. If a vent is in the middle of the room, you’ll need to cut a hole in the carpet or place the rug around it. Measure the vent’s location relative to the walls. Also, consider the pile direction. Carpet has a grain. If you install pieces with different grain directions, they’ll look like two different shades. Make sure your installer knows to keep the grain consistent.
Finally, talk to a professional before you buy. Even if you’re DIY-ing, a quick consultation with a flooring expert can save you from hidden traps. Show them your sketch and measurements. Ask, "Does this look right?" They might spot a issue you missed, like a subfloor irregularity or a better way to handle a seam. In 2026, many retailers offer virtual consultations where you can upload your photos and sketches. Use these resources. They’re free or low-cost and provide peace of mind. Remember, measuring is an act of care. It’s about respecting your home and your budget. Take your time. Be thorough. And when you finally unroll that rug or walk onto your new carpet, you’ll know it fits not just the room, but your life.
Getting the measurements right is the foundation of a successful flooring project. It transforms a potentially stressful experience into one of excitement and anticipation. By following these steps—gathering the right tools, sketching the space, measuring meticulously for both carpet and rugs, handling tricky areas with care, and double-checking your work—you set yourself up for success. There’s no magic trick, just attention to detail. And when you see the final result, a space that feels intentional and comfortable, you’ll realize that the effort was worth every inch. So go ahead. Measure twice. Buy once. Enjoy your beautiful, perfectly fitted space.